Showing posts with label crafts. Show all posts

Wednesday, May 18, 2011

Shake Your Pom-Pom's

Hmmm...I hope the title of this post doesn't garner strange bits of conversation. I thought it was funny, but now I have placed the words to a certain Ricky Martin song and I am feeling like it is quickly becoming inappropriate. Typical. Anyway...

I promised you some party details from Ruby's Golden Birthday Party (if you missed the deets on the party check them out here) and I am actually keeping that promise. Now, I am going to let you know that I didn't know that I got the privilege of being in charge of decor until right before the party (well, I didn't have a whole year to plan like for Eden's upcoming first birthday...) so I was coming up with ideas rather quickly and implementing them even quicker. This means no step by step tutorials because honestly I had no time to take photos as I was frantically putting together the decorations. Zero. Zilch. Nada. In fact we were finishing things up as the birthday girl was walking through the door. I always say I work best under pressure, but man, I really pushed it to the limit this time. 


All of the decor came from inspiration I found all over the web. However, most of it came from my love, Pinterest. Honestly I don't know what I would have done without it in this situation. I had already 'pinned' some ideas for parties (without a specific one in mind) and thankfully they worked out for this particular party. It was pretty great. Other ideas just came off the top of my head (or Josh's in some cases) and we just worked with what we had or could find easily. 


The pom poms. I am starting with these because they have had their day of fame and then some. Martha did right on this craft because they are easy (once you get the hang of it) and look great. Oh and the best part? They are super inexpensive. Now, we have all seen these in every color of the rainbow, but I thought it would be fun to mix it up a bit. I knew I wanted something smaller to use as a centerpiece, but I also wanted it to have a bit of pizazz. So, I went through my collection of tissue paper (seriously am I the only one who has BOXES of this stuff lying around the house?) and picked out different shades of pink, some that had sparkles on it, and I even found some zebra print paper to tie in with the theme. The gold tissue paper was not one I had on hand, I did buy it, but I think it was probably about 50 cents for the pack so it definitely wouldn't break the bank if you were doing a party on a budget. I used this tutorial to put them together, but I am also going to add a few comments as well. 


Hanging Pom-Poms

1. Stack eight 20-by-30-inch sheets of tissue. Make 1 1/2-inchwide accordion folds (fold on the shortest side or hamburger side as we learned in elementary school) creasing with each fold. (I wanted smaller pom's so I took the 20-by-30-inch sheets and cut them into 1/4's by folding them in half twice. DO NOT try to use less than eight sheets, it won't work so don't even try.)

2. Fold an 18-inch piece of floral wire in half (9 inch if making the smaller version), and slip over center of folded tissue; twist. With scissors, trim ends of tissue into rounded or pointy shapes (I prefer the point version in case you were curious).

3. Separate layers, pulling away from center one at a time.

4. Tie a length of monofilament to floral wire for hanging (I didn't do this step because I didn't want to hang them, of course you are welcome to do this step if you do choose to hang them).


Read more at Marthastewartweddings.com: Pom-Poms and Luminarias How-To 

Oh and if you are thinking that the tissue pom-pom's look familiar, we also used them at our gender reveal housewarming party (thank you again Maggie for making these for us!)


Back to the centerpieces. So, to give the pom's a bit of height since they were the stars of the show on the table, I placed them on top of square votive holders that we had leftover from our wedding (we have like a gazillion so I use them for EVERYTHING). We bought out WalMart's entire stock. Seriously. Josh and I would go to two different ones in Salem (and we even ventured to others in various cities) and would pile the cart high with all of the ones they had. We did this at least six different times. Yep, we were THOSE people. 

To finish off the centerpiece I just threw on a couple of votives that we had leftover from when Josh proposed to me (duh, obviously it was to me) and then threw on some handmade confetti. 

How did I make the confetti you ask?

Simple.

I picked out a couple of sheets of scrapbook paper at Michael's, borrowed a circle craft punch (thanks Jessie!), and punched away. I also had wanted to make confetti from black and white photos of Ruby. I actually tried, but it turned out horrible I ran out of time. Seriously though, if you are throwing a party for someone, you should definitely do this...just don't try to do it at the last second before the party and definitely use heavy weight paper. Trust me. Here's a photo of photo drink sticks, but you could easily adapt this into confetti.


Cute right? And so very perfect for a party celebrating the life of someone special.

Alright, I don't want to overwhelm you all in one day with craftiness so I will bid you adieu for the night. More to come!

Wednesday, May 4, 2011

Tray Talk

Mother's Day is coming. Soon. Please tell me you didn't forget. 

Well, even if you did forget...or well, even if you didn't, I wanted to give you a quick crafty project to tackle just in case you hadn't yet decided on a gift for your beloved mother. 

Here's the skinny. Some moms are hard to shop for. You know they work so hard and do so much all year long, but when it comes to buying them something you just don't know where to start. I think most moms oftentimes don't feel like they actually "need" anything so you are left trying to figure out what extra special thing you can give to the woman who birthed you or brought you into her life in some way or another. Honestly I am all for handmade. I think any gift that was thoughtfully made by you shows just how much you care. It's a great excuse to get your craft on as well...and that is never a bad thing. 

Last year I made a chalkboard tray (I know, using old craft projects as blog material seems to be a theme lately) and it is now well used by my sister from another mister, Ruby. Yes, the same Ruby who just celebrated her golden birthday. Okay, I know what you are thinking, Ruby is not my mother. This is true. However, in going through old photos of projects I had done, I came across the tray and thought it was such a great gift for anyone, especially mommies. Now, this would be the part where I show you that photo. The problem is I wasn't so great at using my camera back then and the photos are so blurry that even I had a hard time making out (that's what she said!) what it was. So, without further adieu, I give you a whole bunch of other people's chalkboard trays that I found all over my beloved internet. 


via

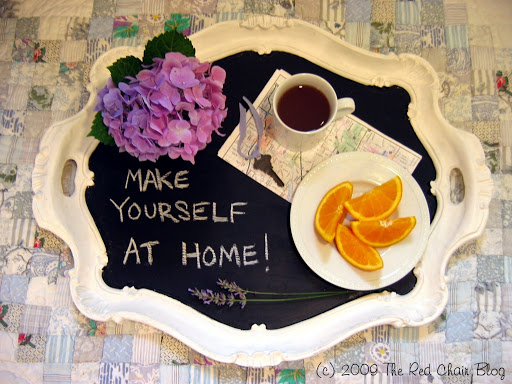
Trays can be used to write notes to the family or even to have in a guest room with some welcoming words and some toiletries or even a little snack as shown above.

via
Does your mom love tea? Have a grown up tea party outside with her new tray. Oh and husbands, you aren't getting out of this that easy. Why don't you use those DIY skills I know you have and make your wife a chalkboard tray of her own AND THEN do something bold. Go cook her breakfast and serve it to her in bed. Stop your whining. I don't care if you don't know how to cook. Go watch some Food Network, do a little googling, and figure it out. Trust me, she deserves it and she will love you and your burnt toast.

via
Nobody said chalkboards have to be black (or green like in elementary school). Find a chalkboard paint in your mom's favorite color, or find one that matches her decor. Need some inspiration? Check out all of the colors that Hudson Paint carries.


 Want to really get your hands dirty and can't find the paint color that you really desire? Make your own. Check out the oh so talented Kate from Centsational Girl's great tutorial

via
  
Not feeling the whole tray thing? Then, grab something else and paint away! Seriously, if your mom loves to cook or garden, how cute would painted chalkboard pots be? Honestly, the possibilities are endless. Just head out to your local thrift store, Target, wherever and find something that looks like it wants to be painted. 

Oh and most definitely don't forget the chalk. Preferably some pretty colored chalk. Although, white is always nice as well.

Now, go forth my pretties and make something nice for that special mom in your life.

Wednesday, April 20, 2011

Easter Treats

The following Easter idea I am sharing for you is actually rather old. This is something from LAST YEAR. I know, how shameful. The thing is, I am always so late on getting stuff together for holidays that it is just too late to post it. So, I saved it for that entire year so I could share it with you now (granted Easter is only 4 days away). 

Easter last year was spent at my parent's house. I knew I wanted to bring a little treat to put at everyone's place setting and I knew it had to be inexpensive. Well, I found a few supplies at Michael's (I believe I even used a coupon or two) and got to work on creating treat boxes. This is what I came up with.


I found some clear chinese takeout boxes and some cute Easter ribbon, both at Michael's. The name tag on the front was made using some leftover scrapbook paper that I already had. Yes, if I had more time I would have made the tags a bit cuter, but a sharpie initial just had to do. Inside I put some inexpensive blue Easter grass (I believe I found this for super cheap at WalMart), and a bunch of bunny related candy. 


Although this project was quick and easy on the pocketbook, I still think it added just a bit of fun to the table. I also threw a cloth napkin that I had found on sale at Anthropologie and a blue vase with some tulips from our backyard just to add a touch of spring. 


The great thing about these favor boxes? You don't just have to use these for Easter. These are great for any holiday, party, hostess gift, whatever. What should you put inside them? The options are limitless. Well, you couldn't put an elephant in there because obviously it wouldn't fit....but I think you get the point. Hmm...I think that elephant comment is an indicator that I have been staying up too late blogging and editing photos every night instead of sleeping. Honestly, is sleep really that important? 

So, what are your Easter plans? It looks like this year we are going to our church's Easter service in the morning and then heading up North to eat some yummy food with Josh's side of the family. We are most certainly hiding some Easter eggs for Eden...I am thinking of filling them with some of my favorite chocolate candy...you know, cause she can't eat them. I am so cruel. 

Thursday, March 3, 2011

Yarn Wreath Revealed

Confession. I started this wreath shortly after Eden was born. I actually got the wreath part done fairly quickly, but the flowers...well, I took a bit longer to get those done. I don't know why, but the flowers made me quite nervous. What is funny is the fact that the flowers were SO SIMPLE. I am so glad I finished this up just in time for Spring! 


My wreath likes to flaunt all her curves. Check out this close-up shot of her. Oooh yummy. 


I forgot just how much I L.O.V.E crafting. I already have some plans to work on some more fun projects that may or may not include the flowers I finally got the courage to create. 


I am not going to do a tutorial on making this wreath since there are some great tutorials out there, check here. I will say, I am definitely glad I bought one of those wreath forms that look like hay instead of the styrofoam ones. It seemed to work really well. I kept the plastic wrap on which made it super simple. I also found that holding the wreath still and just wrapping the yarn around it made for the easiest process. 


As for the flowers, again I'll leave it up to the other fabulous bloggers out there that made some easy to use tutorials. You can find the rosettes tutorial here and the giant flowers here. Oh and because I have commitment issues (this is why Josh proposed two months after we began dating..) I hot glued paper clips to the back of the flowers so that I could move them wherever and change them up if I so desire. Why paperclips? Because I am lazy and that is what was right next to me on my desk. 


If you need a craft to keep your hands busy, or need a gift for a friend or family member, make one of these! I am quite addicted and I am pretty sure I need to make a million. Don't be surprised if you get one from me because we definitely don't have room in the house to keep all of the ones I want to make.


Oh and if you want to save money here's what you do..collect your supplies by using those handy 40% off coupons at Michaels. It may take you awhile longer to get all of your supplies, but you will surely save a few bucks which in my book is so worth it. 


Now go forth and prosper craft!  

Thursday, February 3, 2011

Icky Love Stuff

Valentine's day is quickly approaching, and although the day consists of a whole bunch of red and pink which gives me a case of the shakes, I still like to think that I am supportive of the holiday. I understand that many have reasons to dislike said holiday, but to me it is just another fun day to celebrate love in all its glory. Obviously I should probably say "I love you" to Josh each day, and I may want to go out of my way to do something nice for him more than once a year, but hey it is an excuse to make heart shaped foods and eat chocolate all day long...not that I have ever needed an excuse for either of those. 


Alright, so how do I deal with a holiday that is rather "lovey dovey" and "cutesy" (which are two words that just do not come up in my vocab all that often)? Well, the thing is, sometimes I just have to embrace it as best as I can. This year there is a sickening amount (read: 4 items) of Valentine's day decor going on, however I really do think I can handle it for all 14 days that I am required to leave it up. Oh and for those of you who happen to adore pink, lovey dovey, cutesy, etc. please don't feel ashamed. I actually do appreciate it, I just don't like to admit to it. I may wear dresses, but sometimes I think I was better suited to be a boy. Oh and no, please do not comment on how you agree that I would make a much better boy than girl, this is neither the time nor place. Thanks. 


I actually took a cue from Valentine's day two years ago. Josh and I had kind of forgotten to use nice words to each other (okay fine, I forgot how to use nice words) so I thought it would be a good idea to cut out a bunch of red and pink hearts that we could write the things that we loved about each other as we felt lead to do so. It became a fun game to look under our pillows at night to see if "the goblin" as he was named, had delivered any hearts that day. We found ourselves discovering some of the little things that we really love about the other person that we would occasionally forget. Well, this year, with the addition of Eden, I thought it would be fun to have some little "valentine's" that we could write on to remind each one of us why we are loved. 


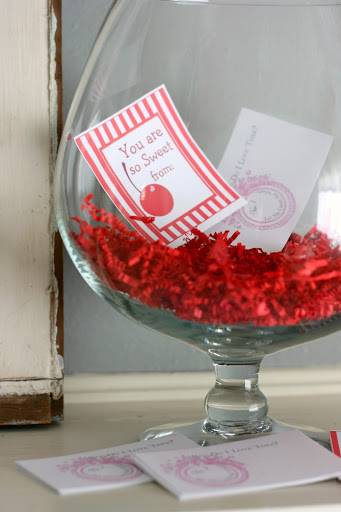
My stipulation was to only use items around the house. So, I found one of my favorite glass footed bowls from our candy buffet at our wedding as well as some crinkly paper that was used in a gift at one time or another. Then I found some printable valentine's and voila! We were now in business to write some lovey dovey stuff  to the members of the family. I find this to be a super simple way to celebrate this holiday by really reflecting on why you love your spouse, child, pet, grandma, etc. 


I adore these "How do I love thee? Let me count the ways..." valentine's. They were conveniently already numbered so we can just add our little sentiment on it each day and at the end we will be able to see which day the person wrote their little love note. You can find them here. Not quite sure why the paper looks pink in the image...


I thought these valentine's were so perfect for Eden. I just love their whimsical nature. We will write "mommy" or "daddy" on the front, and then there is a spot for a little note on the back. It will be fun to keep these and look back to them from year to year. You can find these here


Aren't they so cute all propped up in the bowl? It is going to be fun to see these accumulating and then read them on Valentine's day. 


I hope you all are thinking of ways that you can have fun with this holiday, despite many calling it a "greeting card holiday." 


Oh and yes, you can see a little peek of what I have been up to on our mantle. I am kind of shaking my head in disbelief that I have decorate the mantle for Valentine's day. And, um, don't tell anyone, but I secretly am liking having some pink and red in the house. Having a baby girl around is getting me all sentimental and cutesy. Oh boy...(pun not intended, but that was quite ironic...). I'll be back again with some photos of the finished mantle...once I get around to finishing it...


**P to the S....or p.s. as most people would say...we have added a few more photos to Eden's flickr page and I did a photo shoot with her yesterday so I am sure there will be more up soon. Well, as soon as she lets me have a few minutes to get them uploaded and edited. 

Wednesday, October 28, 2009

Boo!

Well, it is a tad late to be posting this little craft I did quite awhile ago, but the Emergency Room called and I had to answer. Okay, a tad lame...but it was all I had. I am not quite as funny now that I am not on tons of meds. Even though this craft comes a mere 3 days before Halloween, don't think of it as ONLY a Halloween craft. Really, this garland can be used for ANY event. You can make it for a birthday party, Christmas, Easter, baby shower...I mean really this is a very muti-purpose craft.


All it took was:
-black scrapbook paper
-orange scrapbook paper
-ribbon
-letters printed out from Word
-hole punch
-Fiskars scissors for the wavy border (optional)
-hot glue

Seriously, the only thing I bought was the black ribbon (technically I bought the hole punch, but only because I lost my other one!). Most of you probably have ribbon lying around your house, or at least I do, but I decided I wanted LARGE ribbon and mine was too small. See, if you choose to be less picky than I am than you can do this for free. Yes, I said it, F-R-E-E. To further inspire you all here are some great photos of garlands that others have done...


Today I found the GREATEST GREAT idea EVER on a blog. Unfortunately for you I am not going to tell you what it is. It is actually a Halloween idea that we want to implement next year, but we are still trying to figure out a way to do it for fun this year to a very unsuspecting neighbor. This is why I am not telling you. Maybe another day, but not today.

XoXo,
M

Sunday, October 18, 2009

DIYing the Nest

One of our favorite things about the holidays is decorating. We can't wait to get our hands on those boxes that have been stored away for a year and begin to pull out all those little things that we forgot about. Now, neither of us are huge Halloween people. We like to celebrate, but when it comes to decorating we just are not into the black and orange spooky stuff. I would definitely say we prefer a more muted Fall palette with a few Halloween touches. This year my Halloween touch was coming in the form of glitter. I don't know what it is, but this season has brought about my love for sparkly things. Sometimes I feel like a bug to a light...I just get mesmerized. I definitely got the desire to get crafty for this holiday. Currently we are trying to save for a house and we are living in a very small apartment. Buying items for the holiday was pretty much out of the question (except for a GORGEOUS candle holder that we found for a steal). Here is my attempt at craftiness...

First, I fell in L.O.V.E with these pumpkins. I knew I had to attempt to make them in my own way. There is something inside of me that refuses to do anything EXACTLY the way I see them. This is true even in recipes...I always have to add something or take something away. I guess I am just a rule-breaker like that.


(Trying to find the source for these)

This was my inspiration, but here was my interpretation...


I love his cute little face. As you can see I added some things, used new materials, and didn't use other things. That's the beauty of creativity, you get to interpret it however you want.

I also wanted to add some real pumpkins in with my little pumpkin guy so I got my glitter on one more time and my cute pumpkins went from this...


To this...


Hint: If you wanted to use the pumpkins from year to year, you could easily buy craft pumpkins from Michael's and then keep them forever!

After receiving a few questions regarding this project I thought I would add some information. I chose to use Martha Stewart's glitter (I bought the 24 pack because I love it that much!). I REALLY like her glitter. Yes you can use other glitter, but I think her's is extra glittery and spectacular. I also used Martha's glitter glue with a brush applicator. While I know I could have probably saved money by using a regular craft glue (one that dries clear of course) I decided I wanted to go all out and buy her special glue. Sometimes I am a sucker for things like that. It worked well in my opinion, but I am sure its just regular glue. The colors I used for the two glitter pumpkins was fire opal and onyx. For the pumpkin guy above I used carnelian.


From there I wanted to put them all together to make a tablescape. Remember that candle holder I spoke of? Well, Josh and I found that on sale at ZGallerie and we just couldn't pass it up. I believe it was originally $17 down to $9. We were loving the color. I then searched around my house and looked through our holiday supplies for some more items to add. I found a silver plate, a napkin, and a couple of votives. In order to get a more pulled together look I also found some leaves that were lying on the ground outside of work. I snatched those right up, placed them on the silver plate and here is what we came up with...


We felt pretty good with the end result. Of course I would have liked to add more, but on a serious budget with only a few things to work with it's a great way to add a festive look. I challenge everyone to look around their houses for items that they can incorporate. You would be amazed at what you can reuse and repurpose in a whole new way. Try it out!